Saturday, April 12, 2014

Hamburger Soup

I have made this recipe again last night & was told to post the details. I know I have been slacking big time lately. Have I mentioned that I procrastinate worse than anyone I know…except maybe my hubby. Well I am finally back with a recipe that I cooked twice in 3 weeks because Koby loved it so much. It's a hamburger soup with all the veggies you could want. I loved the recipe because you can add more of one thing or take another ingredient out and it won't do damage. We liked all the ingredients and wanted a lot of different things in there to make it a hearty, warm, filling soup.

Ingredients:
1 lb hamburger
1/2 onion (chopped fine)
2 cans petite diced tomatoes
1 can tomato sauce
2 1/2 cups chicken stock
1 1/2 cups water
1 can corn (drained)
1 can green beans (drained)
1 cup baby carrots (chop in half)
3 potatoes (chopped)
salt & pepper
oil

1. Saute onions til tender in large stockpot
2. Cook hamburger in separate skillet, drain when done (so much grease :P )
3. Add all the ingredients (hamburger, green beans, corn, carrots, potatoes, stock, water, tomatoes, and tomato sauce, seasonings) into stockpot with the onions.
4. Bring to boil.
5. Reduce heat & let simmer til potatoes & carrots are tender.

It usually takes only 2 hours for it to cook through but if you want it to go all day then you can put it all in a crockpot on low or on low on the stove without boiling. You'll know it's ready when the potatoes and carrots are cooked through.
This was our go to soup for those surprise cold nights because I had almost all of this in my kitchen. It's worry free and fool-proof which is awesome for me. I had a little helper when I dropped a potato piece off the counter too. Raleigh is a little cleaner. She picked up anything I dropped during cutting and throw it in the trash can. She may also be doing this because she knows momma has food and she wants to get on my good side. She comes up to me and says "Peas" when she wants anything to eat. She hasn't gotten a handle on the L in please yet, but it's so cute that I can't correct her. I just smile ear to ear. Her grandparents can't resist it either so we will have to watch that ;)

Tuesday, April 8, 2014

PB Inspired Growth Chart

Goodbye winter weather & HELLO SPRING FLOWERS!

I hope everyone is enjoying this nice spring weather. It's raining here in Tennessee today but I'm not fretting because I know I won't freeze my toes off when I walk outside. I  am excited to work on more projects now because I won't have to bundle up in 3 layers to go outside. I did manage to get in a few projects this week while it was raining, the porch has now been taken over ;) hehehe.

I have already gotten several compliments from friends that have seen my new growth chart. I got the inspiration from Pottery Barn's growth chart that's here. I was not so fond of the colors or price. I knew that I wanted it to be a beautiful wood tone, so I went with this one. I also had two other projects lined up with wood so I got the quart size.

Supplies:
Stain
Foam brush
Sock/Rag
Sander
Measuring Tape
Decal
1x6x6

First, I sanded down the board so it was perfectly smooth, then started on the stain. Now doing stain you should have a rag or old sock that you don't mind throwing away after using it. Apply the stain with a foam brush, I used one of those cheapy ones. After about 10 minutes, wipe the excess off with the sock. I did 2 coats on each side so it was a perfect walnut color on both sides.
I don't have a machine to make decals, but I know I would probably use it a lot if I had one. Hmmm…maybe I need to do some shopping. So I purchased mine off Jane.com from Shelby's Boutiques on Etsy, I got mine when it was on a great sale, but they are still on a good sale on her page…here. Most of the decals like this that I found on Etsy were almost $20, hers is only $14! She also sent great, detailed instructions on how to apply the decal too. If I ever do one of these again for friends or family then I will go through Shelby again.
I applied the decal & peeled it off. All done! It was quick and painless. I don't have a definite place for it yet, especially since I am bringing 2 other creations in this week, but I will find a permanent home on my wall for it soon. And no I don't keep it outside; I couldn't get a good picture inside because it was such a dreary, gloomy day. This was the best I could get at the time.
Maybe here?
Another thing I love to do is chalkboards. I am making a big chalkboard now, but until then I use my vinyl fridge chalkboard. Here is a fridge chalkboard that I got done a few weeks ago. I learned a few new tricks & love the way it turned out. Check out my Instagram for more chalkboards I've done & some cute baby pics.
 I have to say 18 months is probably my favorite age right now. Raleigh loves brushing her teeth.
Thanks for stopping by & checking us out. Let me know what yal think below in the comments. :)
Enjoy this beautiful Spring weather!

Thursday, March 27, 2014

Nice Weather, Finally!

The other day I was finally able to get me and Miss Raleigh out of the house. I opened the windows and got to work on spring cleaning the porches, while she ran around terrorizing our tiny dog "Taco". They ran around "playing" while I swept, picked up trash, and tried to make my house not look like a tiny tornado tore through it. Finally, I got to go out and enjoy the beautiful day with her.
We even got to go to the park down the road. We live in a small town, but as soon as there is a warm day people swarm the park like southerns swarm grocery stores when there is 2 inches of snow coming. You know what I'm talking about if you live in the south ;) I was asked 3 times if we were stocked up on supplies just in case…it was suppose to snow 3 inches. Guess how much we got…none. That's Tennessee for you, "If you don't like the weather wait 5 minutes."

Well we made it to the park after the crazy mom crowd disappeared & ran off some energy.

A beautiful sunset to end a beautiful weekend. 


Monday, March 24, 2014

Cheesey Chicken Roll Ups

Have you ever had those nights when you have to make dinner and you've either been cleaning all day or been so busy making sure your kid doesn't pour out the dog food bowl that you completely forget about dinner?

I had one of those nights last week. I needed a quick dinner fix, and I had been eyeing a recipe that I found on Pinterest…i know so surprising ;). Anywho, I had everything I needed already and it looked simple enough, but I was worried about how it would taste. Thank God for curiosity, because if I didn;t have any then I would not have had the courage to make this. It is definitely a keeper for my family.

Ingredients
1 Roll of Crescent Rolls
Shredded Cheese
2 Chicken Breasts
10.75oz Can of cream of chicken
Milk
Salt & Pepper
Preheat oven to 350
First, boil the chicken til its cooked through. 

Then, shred the chicken (my handy mixer did that step for me…I love that trick)

Mix your can of soup & milk in a bowl. I just filled the soup can with milk so it was equal parts.
Roll out the crescents. Put cheese & chicken on the dough. Roll up!
(It might take a few tries to get the hang of it.)
Obviously, it doesnt have to look fancy. I just pulled the ends in and tucked around.

Place in 13x9 pan
Pour soup/milk mixture overtop rolls.

Pop in oven for 25 minutes or until golden brown.

Viola!!!
You can see how much my family liked it. 

I hope you do too. It's inexpensive, quick, and delicious nothing sounds better than that.


Saturday, March 1, 2014

Upcycled Diaper Boxes

If you are like me then you accumulate a ton of boxes. Diaper boxes, wipe boxes, boxes of things you shouldn't have bought online but couldn't help yourself :D. I have a lot of boxes stacked near the trash that drive me crazy. I had seen a few posts about up-cycling your boxes into cute storage. I like that much more than spending a lot of money on baskets that you can't customize. This way I could pick out my patterns and colors.

I decided to go with neutral & simple so I can move them from room to room if I want. I got some 12x12 scrapbook paper, which was big for my boxes so I had to cut it, for about 30 cents each.  I did not care about the sides as much since they are going to be on a shelf next to each other and up high so I wont even see the sides.

Supplies
Scrapbook paper
Exacto knife or Scissors
Modge Podge
Applicator brush
Spray paint (optional)

Set the box upside down on the scrapbook paper. Pretty side down/white backside up. Trace the outline of the box so you know where to cut. 
Cut as close as possible. 

Spread a layer of modge podge on the front of the box. 

Then immediately put the scrapbook paper on. Smooth out all the bubbles and let dry. 
 Before spray paint:


Thursday, January 30, 2014

Valentine's Glitter Garland

This year I am determined to have more festive decorations, but I have to do it with a small budget. *sigh* If only we had unlimited funds to spend, but then I don't think I would ever leave Hobby Lobby or Target. I will gradually add to my holiday themed decorations over the years and Raleigh can help me in the coming years. 

One thing I saw and fell in love with was glitter garlands/banners! I had seen it on other blogs but didn't want to spend the money on them when I knew how easy they were to make. So you can imagine where I went to get my supplies…Walmart?…noooo Hobby Lobby. 

Supplies:
Twine or String
Glitter Scrapbook Paper
Hot Glue Gun
Exact-o Knife

First, I printed out a template to trace on the back of the scrapbook paper & cut it out from the back.
 
Find out how much string/twine you want, cut, and lay out your letters to see how it will look.
Finally, break out the glue gun and get to work! 

I wanted my garland to go with an empty frame I have had stashed behind my couch for months. It stared at me for weeks and I couldn't figure out what to do with it so I hid it away. I put it to good use now on my table with this pretty banner. I found two beautiful windows this past week that I've been hunting for to decorate with around the house. I punched a few circles out too so this window didn't feel so boring. 
I had bought 2 sheets of the glitter paper, just in case, so I had a whole sheet left over. I found another frame that had been neglected to be hung (hubby is a procrastinator like me). I put a piece of black and white scrapbook paper in and cut out a heart on the glitter paper. I used a cookie cutter as my template which turned out perfect.
my preview from Instagram
ALL DONE!
It's simple and to the point. I love this set up and it only cost me a few bucks! 

What do yal think?

I have a lot of old diaper boxes in Raleigh's closet that just got a makeover. I will try to get that up by tomorrow, if I don't get distracted with more painting. :D hehehe


Saturday, January 4, 2014

Photo Canvas Transfer

HAPPY NEW YEARS!

I'm Back! I know I have been gone through the holidays. You know how busy, hectic, I wanna pull my hair out kind of crazy it gets. We enjoyed the holidays the best we could this year since we had a few people missing from the celebration. We ate lots of good food, had a few drinks ;), and just enjoyed being around the family.

This year I didn't get to do a lot of homemade gifts like I wanted to do, but I did one in particular that I love. I transferred blown up photos to canvases for two sweet little boys I know. They are both football players and they are about to get a makeover in their room in a sports theme so I thought it would tie in perfect.

Supplies:
12x16 canvas (Walmart)- $9.67
Modge Podge (on hand)
Foam brush (on hand)
11x14 pictures (Walgreens)- $10.99each  $7.26each with coupon

I did not know how well it would work out with the difference in the size of the canvases and the prints but being so close to Christmas, everywhere was sold out of the size I did want so I had to compromise.   I liked how they turned out though because there was enough room for their names.


1. Painted the edges of the canvas & sides that would show because the picture was too small.

2. Find out where you want the picture to be on the canvas
3. Spread Modge Podge on the empty canvas generously!
4. Lay the photo on the canvas exactly how you want it, smooth out any bubbles underneath. 
5. Let dry, make yourself some coco or coffee because it doesn't take long.
6. Put on another layer of Modge Podge over each picture. (Don't worry it wont stay cloudy)
7. Let dry.
8. You can draw or paint on there now. I used chalk since it was a matte black paint I used. (It got smudged in the traveling on Christmas) 
The boys were so excited and their parents were amazed too. Their mom did awesome homemade gifts too so we got homemade scarves (sooo soft! it was like butter, but not slimy), a baby infinity scarf, a baby headband, and some chalkboard mason jars! She knows me well I think ;)
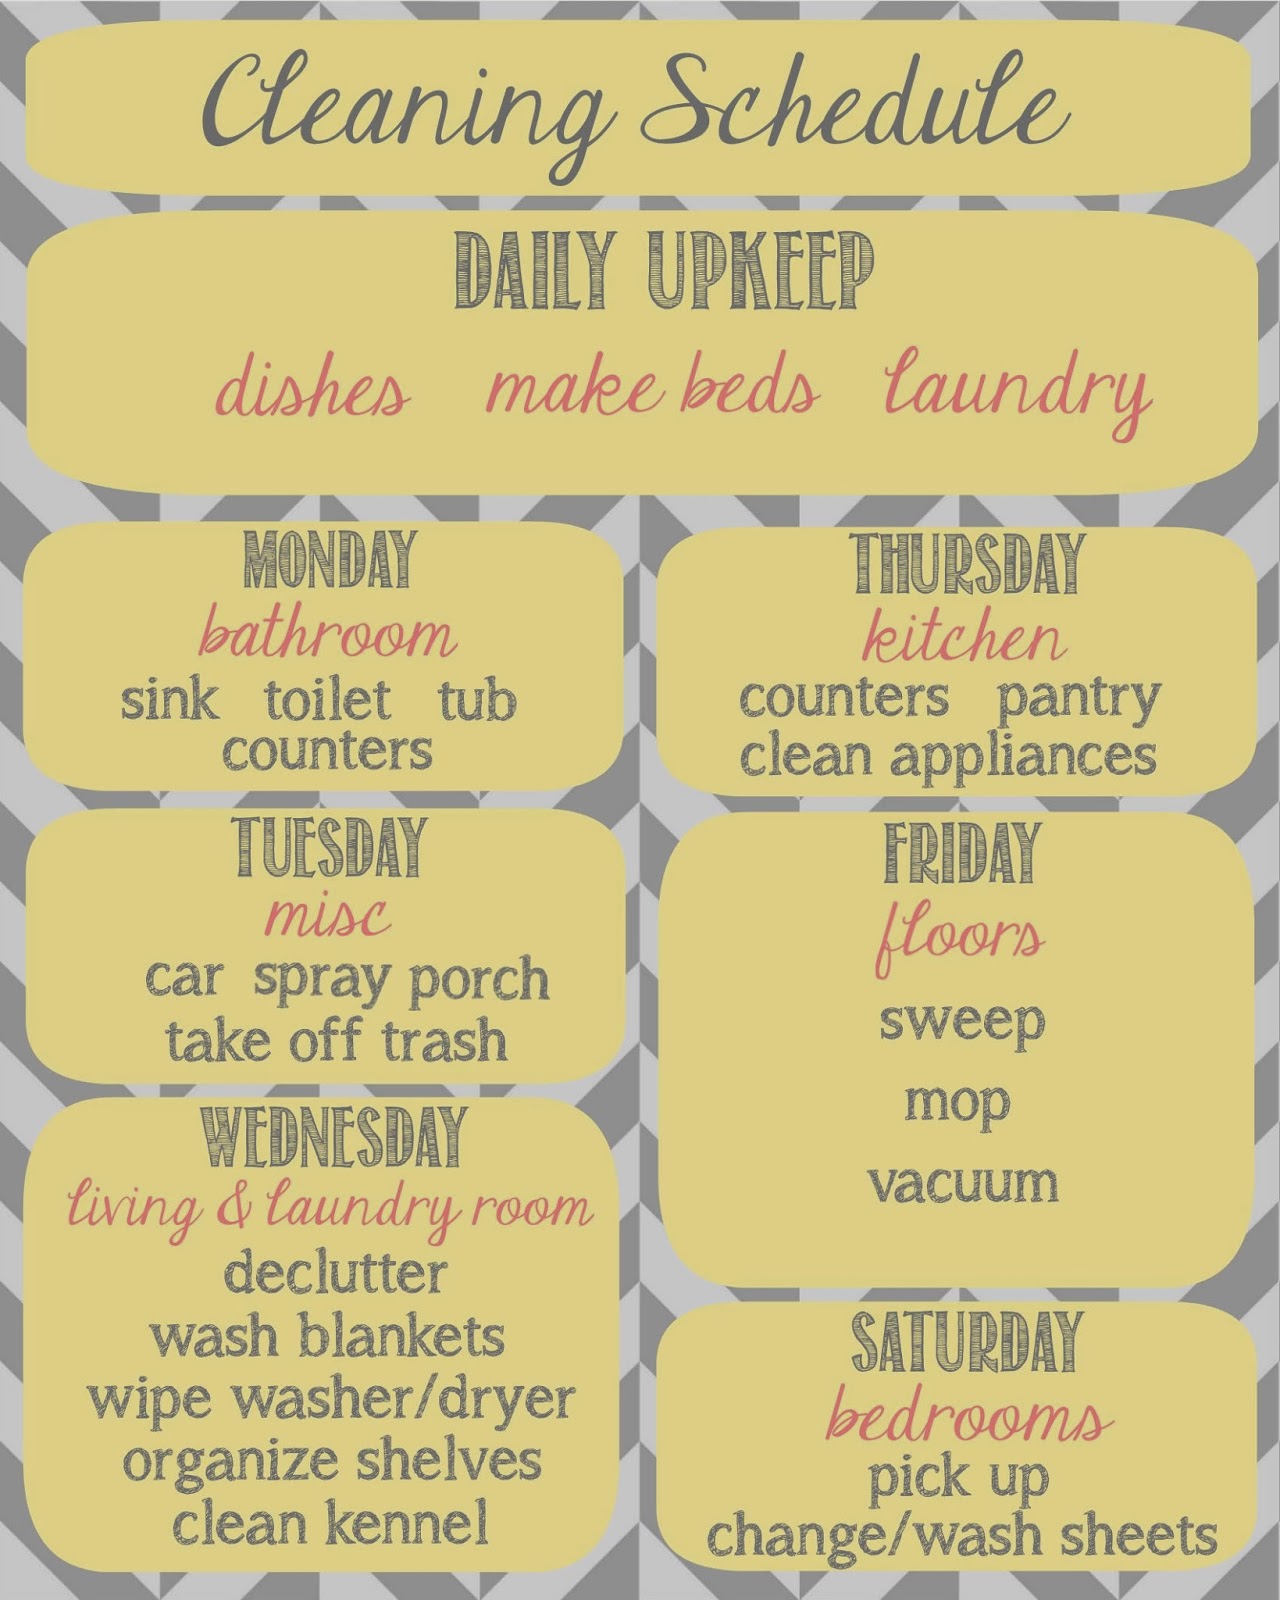
I am also working on a weekly cleaning checklist to get more organized and on a better schedule this year. I hope I stick to it; I tend to procrastinate…a lot.
Hope everyone has an awesome weekend! Today is hump day for me, but I see the finish line. Also keep my little Raleigh in your thoughts. She has been sick for awhile now and it's just getting worse so she is going to those nice white coat doctors today for help.