Thursday, January 30, 2014

Valentine's Glitter Garland

This year I am determined to have more festive decorations, but I have to do it with a small budget. *sigh* If only we had unlimited funds to spend, but then I don't think I would ever leave Hobby Lobby or Target. I will gradually add to my holiday themed decorations over the years and Raleigh can help me in the coming years. 

One thing I saw and fell in love with was glitter garlands/banners! I had seen it on other blogs but didn't want to spend the money on them when I knew how easy they were to make. So you can imagine where I went to get my supplies…Walmart?…noooo Hobby Lobby. 

Supplies:
Twine or String
Glitter Scrapbook Paper
Hot Glue Gun
Exact-o Knife

First, I printed out a template to trace on the back of the scrapbook paper & cut it out from the back.
 
Find out how much string/twine you want, cut, and lay out your letters to see how it will look.
Finally, break out the glue gun and get to work! 

I wanted my garland to go with an empty frame I have had stashed behind my couch for months. It stared at me for weeks and I couldn't figure out what to do with it so I hid it away. I put it to good use now on my table with this pretty banner. I found two beautiful windows this past week that I've been hunting for to decorate with around the house. I punched a few circles out too so this window didn't feel so boring. 
I had bought 2 sheets of the glitter paper, just in case, so I had a whole sheet left over. I found another frame that had been neglected to be hung (hubby is a procrastinator like me). I put a piece of black and white scrapbook paper in and cut out a heart on the glitter paper. I used a cookie cutter as my template which turned out perfect.
my preview from Instagram
ALL DONE!
It's simple and to the point. I love this set up and it only cost me a few bucks! 

What do yal think?

I have a lot of old diaper boxes in Raleigh's closet that just got a makeover. I will try to get that up by tomorrow, if I don't get distracted with more painting. :D hehehe


Saturday, January 4, 2014

Photo Canvas Transfer

HAPPY NEW YEARS!

I'm Back! I know I have been gone through the holidays. You know how busy, hectic, I wanna pull my hair out kind of crazy it gets. We enjoyed the holidays the best we could this year since we had a few people missing from the celebration. We ate lots of good food, had a few drinks ;), and just enjoyed being around the family.

This year I didn't get to do a lot of homemade gifts like I wanted to do, but I did one in particular that I love. I transferred blown up photos to canvases for two sweet little boys I know. They are both football players and they are about to get a makeover in their room in a sports theme so I thought it would tie in perfect.

Supplies:
12x16 canvas (Walmart)- $9.67
Modge Podge (on hand)
Foam brush (on hand)
11x14 pictures (Walgreens)- $10.99each  $7.26each with coupon

I did not know how well it would work out with the difference in the size of the canvases and the prints but being so close to Christmas, everywhere was sold out of the size I did want so I had to compromise.   I liked how they turned out though because there was enough room for their names.


1. Painted the edges of the canvas & sides that would show because the picture was too small.

2. Find out where you want the picture to be on the canvas
3. Spread Modge Podge on the empty canvas generously!
4. Lay the photo on the canvas exactly how you want it, smooth out any bubbles underneath. 
5. Let dry, make yourself some coco or coffee because it doesn't take long.
6. Put on another layer of Modge Podge over each picture. (Don't worry it wont stay cloudy)
7. Let dry.
8. You can draw or paint on there now. I used chalk since it was a matte black paint I used. (It got smudged in the traveling on Christmas) 
The boys were so excited and their parents were amazed too. Their mom did awesome homemade gifts too so we got homemade scarves (sooo soft! it was like butter, but not slimy), a baby infinity scarf, a baby headband, and some chalkboard mason jars! She knows me well I think ;)
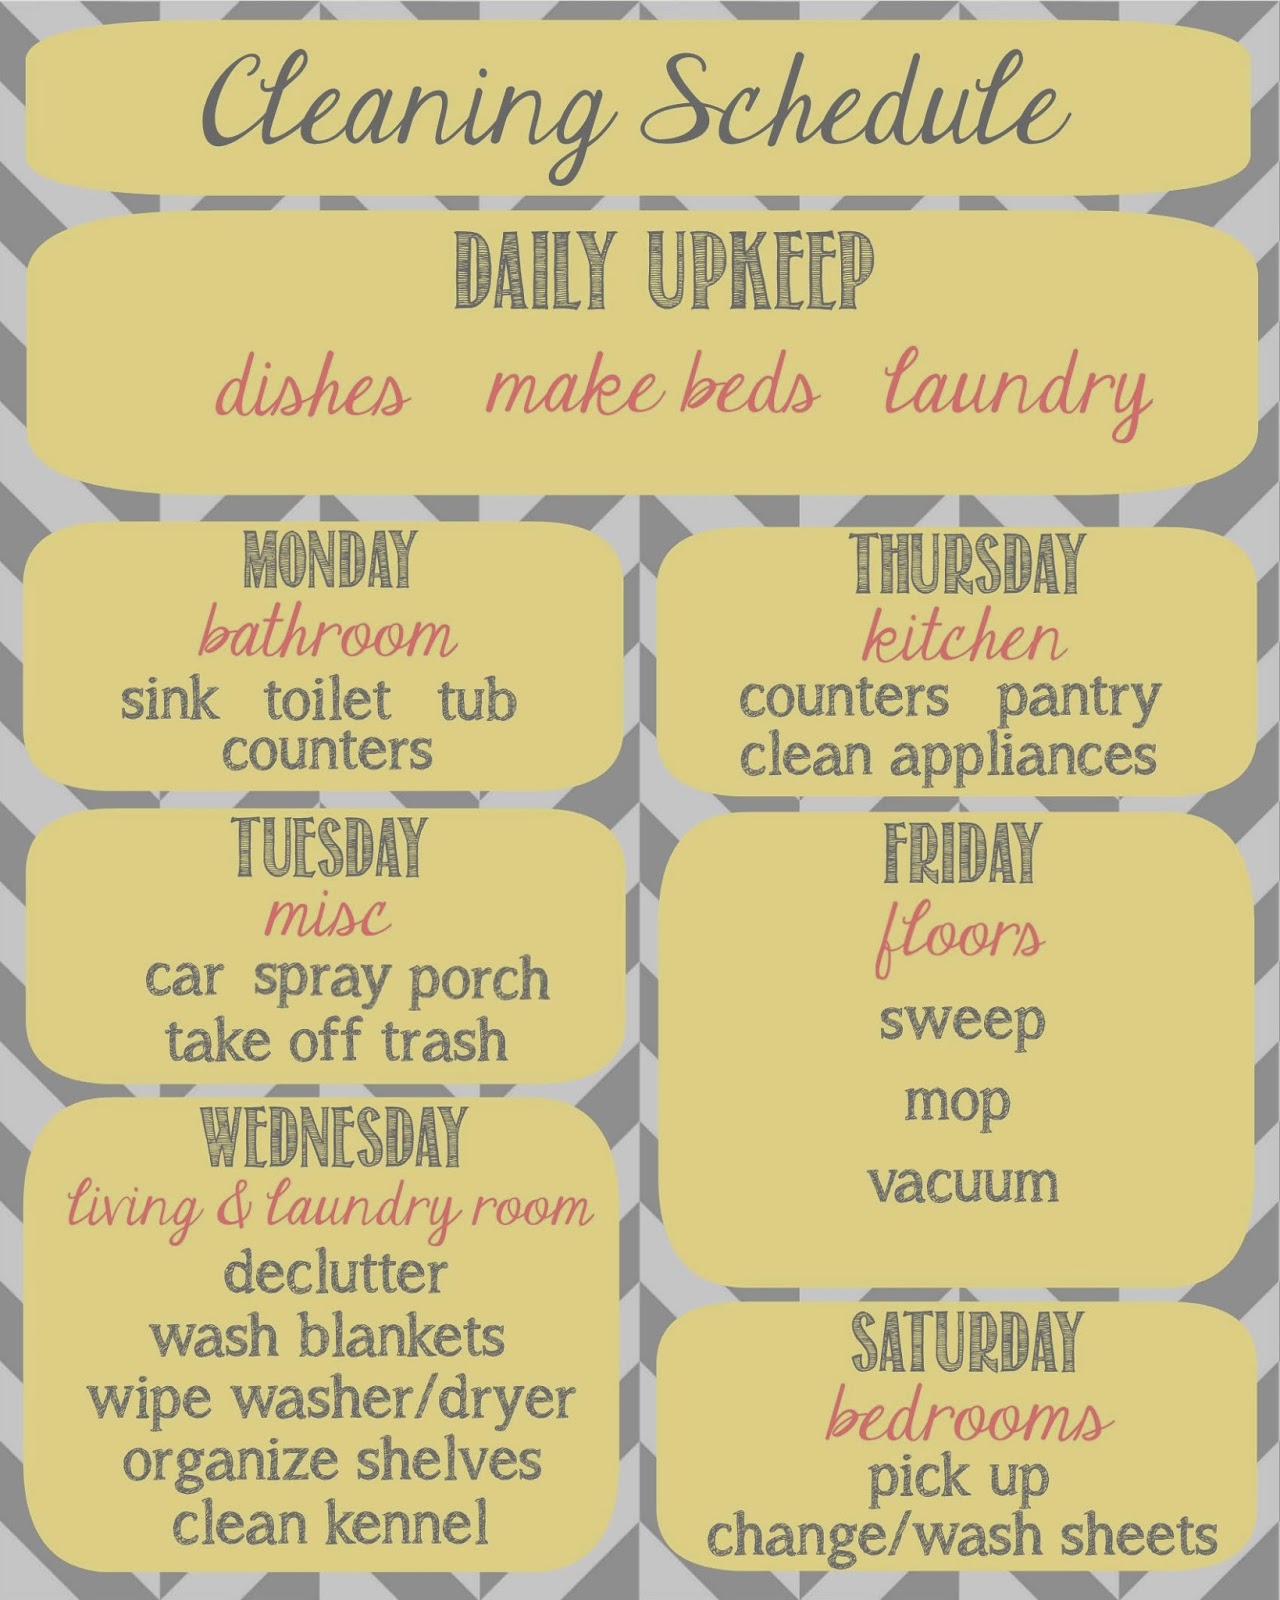
I am also working on a weekly cleaning checklist to get more organized and on a better schedule this year. I hope I stick to it; I tend to procrastinate…a lot.
Hope everyone has an awesome weekend! Today is hump day for me, but I see the finish line. Also keep my little Raleigh in your thoughts. She has been sick for awhile now and it's just getting worse so she is going to those nice white coat doctors today for help.


Friday, December 20, 2013

Cheesy Chicken Enchiladas

Can you believe it…Christmas is only 5 days away!  Everyone is rushing around trying to get last minute gifts and I will admit that I am one of them. Every year I say "I will start early next year"…that never happens unfortunately. Even with all the hustle and bustle of the holidays, there is still something you have to do…you've probably guess it…EAT!

My hubby and I eat Mexican food every Sunday at the same local restaurant. The owner knows us and if we miss a week then he makes a point to mention it the next week. He even accuses us of cheating on him…hehehe. Sometimes though we just can't get our fill from one meal a week so we have an easy recipe to keep our cravings satisfied. Cheesy Chicken Enchiladas! I get requests for it alot and this cheesy, creamy deliciousness is definitely worth a try.

Ingredients:
9-10 Medium Tortillas
2 Chicken Breasts
Mexican-Style Melted Cheese
8 oz Cream Cheese
1 1/2-2 cups Shredded Cheese (depends on how cheesy you want it)
1 cup Sour Cream
1/2 Salsa
Taco Seasoning Packet

Instructions:

1. Boil the chicken til white all the way through.
2. Preheat oven to 375
3. Shred the chicken (I love using my Kitchenaid for this part because it's less messy & saves time)
4. Make taco seasoning in skillet -according to instructions
5. Mix in sour cream, cream cheese, shredded cheese, salsa, and taco seasoning sauce in with the
     chicken.

6. Spray the bottom of your pan then spread your melted cheese blend on the bottom of the pan. I   
            usually have to use 2 pans because this recipes makes so much.
7. Put your tortilla shells in the bottom of the pan standing up, ready for the mixture. 
8. Put a few spoonfuls into each shell.
9. Wrap tight.
10. Spread more cheese on top.
11. Bake for 25-30 minutes or until cheese is bubbly. 

I like that everything that needed to be cooked is already done. Now you are just getting all the cheeses melty and delicious. Yum. My family loves cheese so I do sprinkle a little on top as soon as they come out of the oven as well. We eat ours with sour cream or salsa on top. I know this isn't a healthy recipe, but it sure is a scrumptious one. Next time you are having a craving for Mexican food then try this, you might fall in cheese love like we have. 

Thanks for stopping by yal! I gotta go take care of a sick little girl who didn't get much sleep last night and is still irritable from her 15 month shots yesterday. Raleigh is very independent so if she is in a cuddly momma mood then I am happy to be there for her ;)

Merry Christmas Everyone!


Wednesday, December 11, 2013

Pottery Barn Inspired Mason Jar Pendant!

I know some people have guessed on what my DIY project was this week, and finally it's done. A Pottery Barn inspired Mason jar light fixture! It is my main light in the kitchen and it couldn't be more perfect. I found several tutorials months ago and decided that's what I wanted above my island. When our fluorescent light went out in the kitchen, I took it as a sign that it was time to do it. I should've taken into account that my hubby would wait a few more months to actually do it. I don't know anything about wiring or electricity so I had to wait for him to help because no way was I going to get electrocuted.

We got the rest of our supplies on Sunday and got to work. The one at PB is huge with 16 lights. My kitchen is definitely not big enough to accommodate a light fixture of that size and neither can my wallet accommodate the $400 price tag. So we narrowed it down to 10, then the jars we wanted came in a box of 9, then we lost a socket in the never-ending abyss of the truck so we ended up using 8 jars. It lets off the perfect amount of light so I am happy with it. 

What you need:

8  Mason Jars (pint & half)- $10.24
8  Light sockets (this is the one we used)-$24.80
8  25-watt light bulbs (we used these)-$11.96
2  25-ft 18gauge lamp wire (we used this one)-$8.98
50  wire nuts-$5
3 sticks  3/8 pvc pipe (optional)-$5.94
Black spray paint (had already)
Drill (had already)
Wire cutter (had already)
Phillips screwdriver (had already)
Wood-$20 (we got the big piece bc we needed it for another project)

TOTAL: $86.92

This picture makes the lights look fluorescent almost but they aren't. I used 25 watt bulbs because i knew anything higher than that would light up my house like a beacon in a lighthouse. They ended up being the perfect wattage. 

So this is how we did it!

First, we took down all the old light fixture stuff, all the way down to the hole with wires coming out. Whoever previously installed ours didn't know what they were doing because it was hanging on by one screw and it wasn't even in a stud...just drywall. I'm surprised it hadn't fallen already. 

Next, cut a piece of wood that fits into your previous frame or build a box if you didn't have one. An Adams Thing did theirs out of metal. Make sure the wood isn't too flimsy or the weight of the jars could make it bow. Start to map out where you want your jars, mark it, and decide if you want staggered. We did staggered so we knew they wouldn't bump into one another. 

Then, drill a hole where you want each pendant; make sure it is big enough for the wire to go through. Feed the wire through and snip off. Use more than what you think you should. You can adjust the height later. 
Time to start the wiring. AHHH! My hubby got started and he patiently showed me how to do it all. Connect one small piece of wire to each hole. Slice & strip the wire up an inch or so then twist the ends together. Make sure you twist the HOT with HOT, this chord has ridges on one side so make sure those stay together when you connect them. Once all three HOT ends and COLD ends are twisted then put a wire nut on each end. The three ends should but the 1 going in the hole, 1 coming from the left, and the one coming from the right.
Next, measure out how long you want your lights to drop down. We did about 16 inches from the board. We cut them to 17 inches because you still need a little left to wire the light socket in. 

Now let's go over to the mason jars. Drill a hole in the center of the lid for the wire (get as center as possible) then more holes around for the heat to vent out. DO NOT forget that part or they could overheat and explode. 
Put the wire through the mason jar lid. To wire the light socket, split and strip the last inch of wire again. Then twist the wires around the screws and tighten down. Do this 8 times…it seems like it took forever.
 If you want the pipe to give you a straighter look to the pendants then make sure those are cut and spray painted. Measure and cut those to fit between the top and the lid. We forgot to put those one before we attached the sockets so we had to do it all over again…ugh. 

Without the pipe
With the pipe

Then finally mount it on the ceiling. My hubby did not want it to be attached by screws because if something had to be fixed in the future then he wanted easy access to it. He used door hinges and 2 I hooks. Genius. I'm going to spray paint that soon & stain the wood to match my future countertops ;)


It's a great amount of light and it goes with the country theme I am wanting to do. Next is the countertop, then the sides of the cabinets, and finally the white plank wall. I can see it all coming together. Almost done! YAY!

What do yal think about my new light? My mother-in-law is already requesting one. :D

Monday, December 9, 2013

Thanksgiving, Family, and a Sneak Peek

Hey yal! I am so sorry that I have been gone since before Thanksgiving. The trip to Iowa went great; Raleigh had a blast, but wore me out since I didn't have daddy there to help. I had lots of little cousins to pick up the slack though, because as soon as we got there the little girls were wanting to play with her constantly. It has been 4 years since I have been up to Iowa. The last time we went was when Koby & I announced our engagement to some family members. It was nice to see my distant family, but also very nice to see my mom who lives in Cali so I rarely see her. Mom hugs make everything better...nothing like them. Here are a few pictures from our trip. Also more on Instagram & Facebook
 Nosey rosey. She likes playing with the people behind us.
 She went straight for the John Deere section in the gift shop.

We also had a few deaths in our family this week. Three days after getting back we lost my husband's grandfather, he spent his last moments with us, enjoying a late second Thanksgiving dinner that they planned for me and Raleigh since we missed the first one. It has been a rough few days filled with tears, laughs, and family, but that's what we need right now. This song describes him perfectly and made all of us bawl even harder at the service. Please keep our family in your prayers.
We also lost my great grandma as well, she lived out in Colorado with my father's family. She was a heck of a scrabble player and could out fish anyone. She was 98 and lived a long full life. Sending my love to my family in Colorado and Iowa, sorry I couldn't make it back.
Post coming today or tomorrow of my new Pottery Barn inspired Mason jar pendant! I am in love with it! My hubby and I worked on it last night to keep us busy. He finished it about 2am and woke me up to see because he was so excited. I had work today so I crawled into my warm bed early. 

Sneak Peek
Check Instagram & Facebook for 2 other sneak peek pictures.


Monday, November 25, 2013

Packing for Mommy & Toddler

Finally, the day is here! I leave for Iowa soon and I can't contain my excitement. I won't be pulling a Tom Cruise and be jumping on the couch or anything but I'm close ;). This will be Raleigh's first flight and first time meeting my family. I have heard some horrible baby plane stories and some awesome ones so we are hoping to come back with a thumbs up. It's just going to be me and her flying up and then driving back with my sister. So we are going to experience to types of travel and learn which is better for us.

My not so favorite part about trips is the packing. I think there are two kinds of people: the ones who love organizing, cleaning, and packing & the ones who do it because we have to, not because we enjoy it. Guess which one I am…here's a hint…my best friend helped me organize my new kitchen cabinets & my daughters dresser drawers…repeatedly. Whenever I pack for trips I always felt like I did good organizing my bag until I look at it 2 days into the trip and there's a massive pile of unfolded clothes that could hide a small child. This time I am determined to go all OCD on my suitcase so I won't be swamped with clothes. I have to pack for my mini and me though so now I will have double the amount to sift through. It has been a long time since I have flown so I had to catch up on the security guidelines, fluid restrictions, and now baby info.

My best friend Ashley is one of those organizing, cleaning, and packing people so she offered to help me pack. So here's how we packed for me and Raleigh to go on a 5 day trip.

First, make your list of needs for you:
  • Clothes
    • Dresses
    • Jeans/Pants
    • Tank Tops
    • Tops/Sweater
    • Undergarments/Socks
    • Coat/Jacket/Hoodie
    • Hat/Gloves/Scarf
    • Swimsuit
    • PJs
    • Boots/Sneakers/etc...
  • Toiletries
    • Toothbrush
    • Toothpaste
    • Deodorant
    • Shaver
    • Shampoo
    • Conditioner
    • Body wash/Soap
    • Perfume
    • Makeup
    • Hairbrush/Hair Accessories
    • Straightener/Curler
  • Miscellaneous
    • Camera/Charger/Memory Card
    • Phone/Charger
    • Lip Balm
    • Sunglasses
    • Book
    • Wallet
    • Credit/Debit Cards
    • ID
    • Paperwork if needed to travel
For toddler checked bag:
  • Clothes
    • Dress
    • Jeans/Pants
    • Tops/Onesie
    • Jacket
    • Socks
    • Shoes
    • Swimsuit/Swimmer diapers
  • Toiletries
    • Shampoo
    • Body Wash/Soap
    • Comb
    • Hair Accessories
For Carry-on Diaper Bag:
  • Diapers
  • Wipes
  • Kid Books
  • Toys (no noisy toys please)
  • Snacks (LOTS of snacks!)
  • Tylenol
  • Sippy Cup (no liquid in it until on flight!)
  • Paci
Snacks: Animal crackers, puffs, welchs fruit gummies, Graham Os cereal, Raisins,
more Cereal, mini crackers

I also put my phone charger, camera, and wallet in the diaper bag so if my bag gets lost of anything then I will have the necessities. 

I got some awesome advice to put Raleigh's outfits into separate Ziploc bags and label for each day. That way I will know what matches and where they are instead of throwing everything out of my bag while trying to find a pair of pants. I also put all her bows, socks, and any accessories in the bags too. Since they are all Ziploc bags then they slid in perfectly next to each other in the side pocket of the duffel which left the big section for me. I want to take as little luggage with me as possible so, aside from her diaper backpack, I am not bringing a carry on bag to go in the upper compartment.
I am so nervous about the flight and then the long wait period after we get there. My mother doesn't arrive until 5 hours after we get there. We also have to wait for her so we can all ride together in the rental car. I have devised a plan to find an empty terminal and let her have free reign and run off some energy then grab some late lunch.

We are off at 8:30 this morning. Wish us luck. Keep updated on our on Instagram & Facebook.

Sunday, November 17, 2013

Inspiring Kitchens


After working in my boring, standard building grade cabinets for over a year, I finally got off my butt and started getting my hands dirty. I just started the makeover but I am being optimistic that it will be everything I can hope for in this house. This is not my dream home or my forever home, but I am going to make it the way I want it until I get into my forever home. I have had a few people tell me "No! You shouldn't change it. They are nice." They might be nice for you but not in my eyes. If you have ever had the white counters then you know that they stain almost as soon as anything touches the surface. It's so frustrating that I can't get some stains out no matter how hard I try.

I knew wanted white to brighten up my kitchen and bring more cheer into the space. I also wanted to be able to decorate for every holiday easier and not have to worry about it not blending with the tan. So I went to the best inspirational websites on the Internet to find the perfect kitchen. Pinterest & Houzz were the best by far. They have a wide variety of colors, layouts, styles, and sizes. I decided since I HATE white counters but I want to brighten up the kitchen then I should go with white cabinets. Then contrast with black or rubbed bronze hardware so it will pop.

Here are the few kitchens that were closer to my size and had all the features I loved.


I loved these shelves! Beautiful open shelving is so nice to have to break up all the cabinets in kitchens. Sometimes I see kitchens and feel like the cabinets suck you in because they are EVERYWHERE, so this was a nice way to store pretty items and not just shove them in another cabinet.


This kitchen has a shabby chic feel to it with all the distressed wood everywhere. She also did some open shelves above the stove & pallet cabinet. I like all the grain scoops, graters, and knick knacks around the kitchen because it brings more of a homey, country feel to the space. Check out the adorable small dinette set, perfect for breakfast with my munchkin.


This kitchen in the before stages definitely reminds me of my kitchen. The white counters made me so angry because they stain as soon as anything touches them. I have had a few yelling matches with that super absorbent white devil when my hubby would leave a mess. I also like beadboard backsplash that she used to give the space more texture. This kitchen gives me a better idea into what mine will look like because of the white appliances too.


This kitchen is definitely cozy. It is almost like a dream kitchen for me. I loved everything about it: cabinets, counters, plank walls, built-in fridge, beadboard ceiling, etc… I think we are one in the same. They did a beautiful renovating this kitchen from outdated to cozy country, and all on a budget!

These are all my favorite kitchens that kept me driven to making my space all it can be. I am on my way and hopefully can make it look as good as theirs. Wish me luck. 

Which is your favorite kitchen? Let me know in the comments. :D